Using ZokuZoku
ZokuZoku is a Visual Studio Code extension which helps create and modify translations for Hachimi through a GUI with multiple nifty features. It allows you to work on translations without having to edit the JSON dict files directly.
WARNING
Since a game update, ZokuZoku no longer supports dialogue content. Check out the Legacy UmaTL tools for that, which will also see an overall update soon.
Installation
Prerequisites
Before installing ZokuZoku, make sure to have these installed:
- OS: Windows 10+ or Linux x64. macOS and ARM devices are not officially supported but might work with some special setup.
- Visual Studio Code v1.90 or later (not Visual Studio, they are two completely different things!)
The following files are required by ZokuZoku:
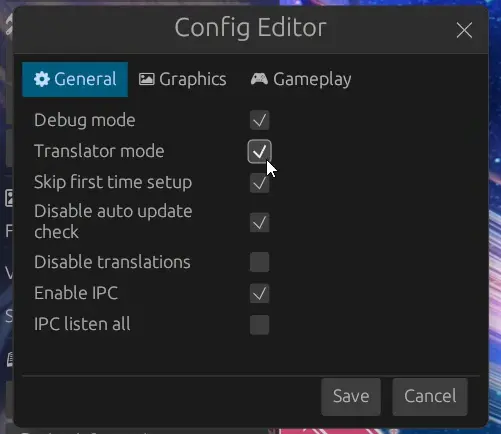
master.mdbandmeta: These files are located within the game's data directory (on Windows this is in AppData, and on Android this is in/data/data, root access required). These two files must be in the same folder, with themetafile in the root andmaster.mdbin a subfolder namedmaster, so that we havefolder/metaandfolder/master/master.mdb. If you have UM:PD installed from DMM on your system, you don't need to worry about these files, ZokuZoku can automatically detect them!localize_dump.json: This file contains the originallocalize_dictdata dumped from the game. Hachimi can be used to create this file:
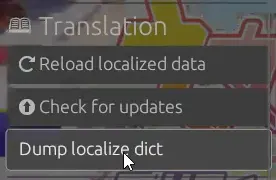
- Enable "Translator mode" in the config editor.
- A new option called "Dump localize dict" will appear under the Translation section in the menu. Click on it to create the file.
ZokuZoku will also automatically detect this file if it was created using the DMM version of the game, following the procedure above, so make sure to do it at least once before installing. You'll need to dump it again whenever the game client updates if you want to keep it updated, otherwise if you don't work on UI translations, you could ignore it.
And of course, you'll also need an existing translation repository to work with. Check out the current ones or make your own.
Installing
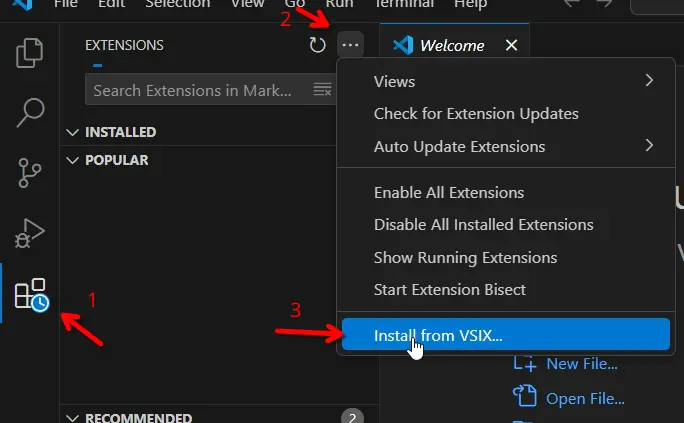
Install from the VS Code Marketplace or download the .vsix file for the latest version on the Releases page, open the Extensions panel in VSCode, click on the 3 dots button on the top right, choose "Install from VSIX..." and select the file you just downloaded.
Initial setup
After installing ZokuZoku, you can now open the translation repo by going to File -> Open Folder... and select the folder you want to open. Note that it should be a folder that contains the localized_data folder, not the localized_data folder itself!
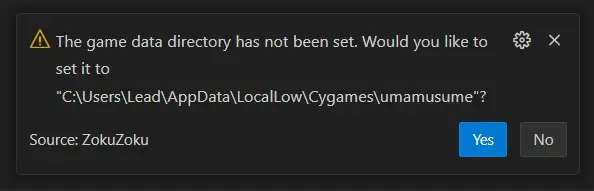
Upon opening a TL repo for the first time (where ZokuZoku has been configured to automatically activate), the following prompt will be shown:
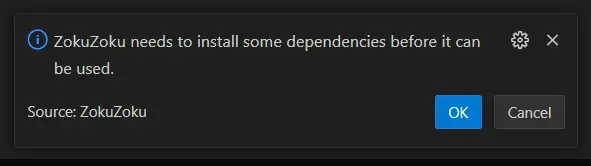
Click on OK to start installing the dependencies, this will take a while to download and install (about 200MB). During this process, a command prompt will show up, do not close it!
If the DMM version has been installed on your device, and you've created the localize dump file as instructed above, the following prompts will show up for confirmation on the auto detected paths:
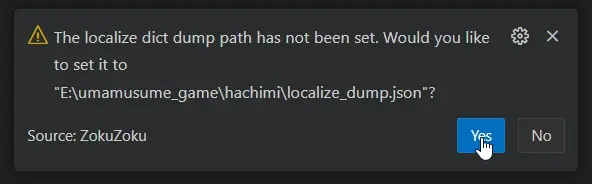
If any of these paths are wrong, you may select No.
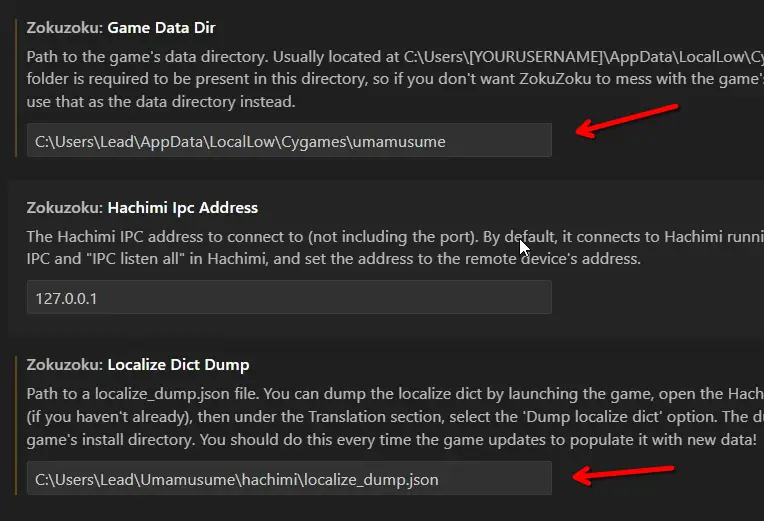
If ZokuZoku failed to detect the correct paths for the DMM installation of the game or you want to use the asset files of another version, you can go into Settings to set them manually.
WARNING
You'll need to restart Visual Studio Code after changing the data paths.
And that's all! You're now ready to make some translations!
Main panel
You may have noticed that a new icon has been added to your sidebar after you've installed the extension. This is the ZokuZoku panel, the main interface to navigate through the translatable assets and launch the editor.
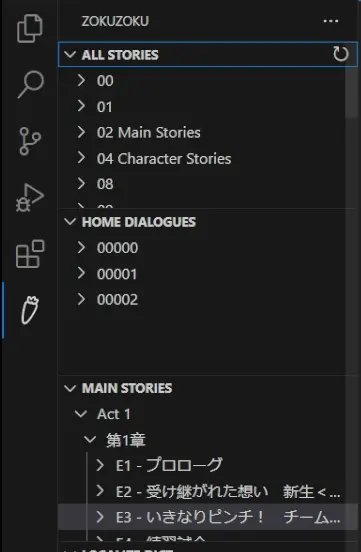
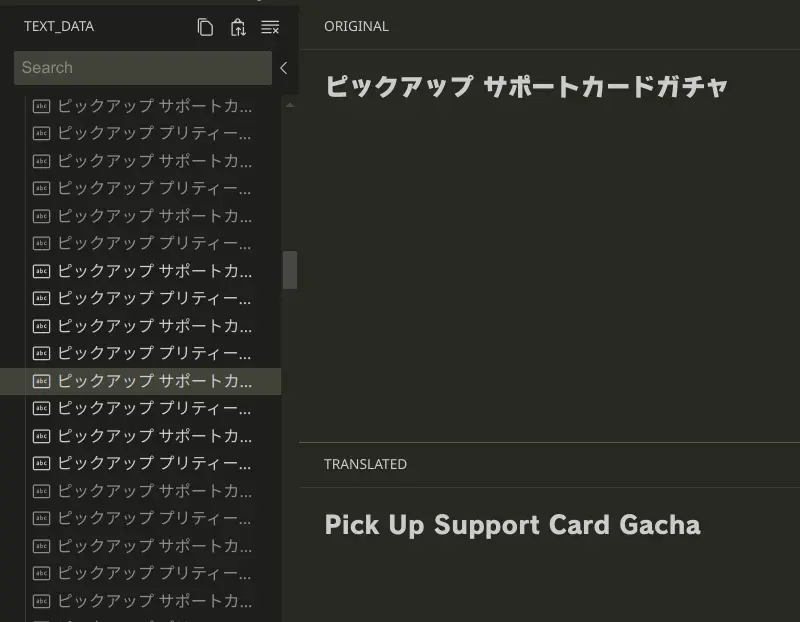
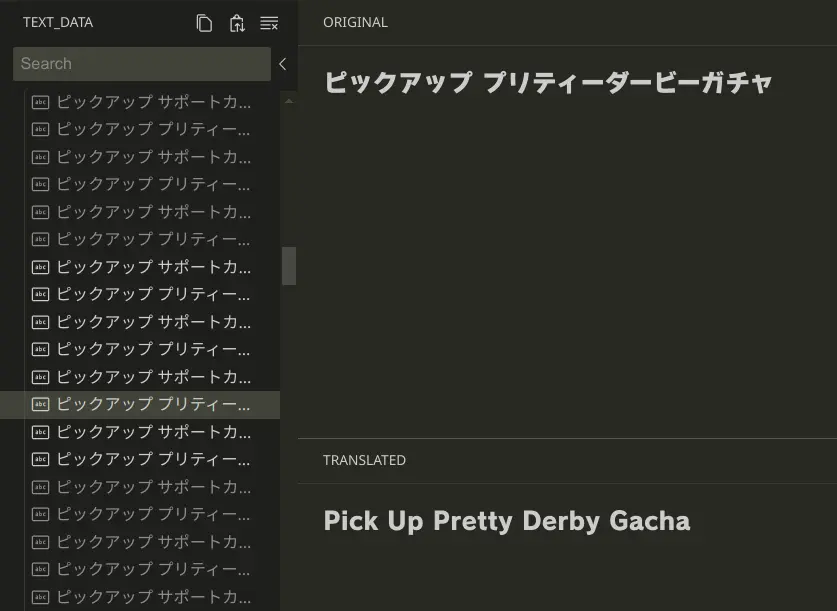
The outer sections of the panel (all stories, home dialogues, etc.) are referred to as "views". Inside of these views are lists of things that you can translate (might be sorted into categories, depending on the type of view). Clicking one of the entries (within the categories) will open up the corresponding translation dict in the suitable custom editor.
Some of these views will display a checkbox next to the entries' name. It tells you whether the dict for that asset exists or not. 
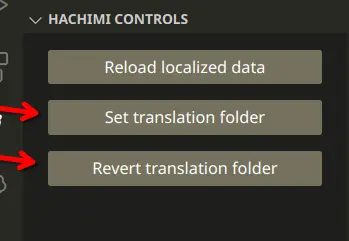
Switching translation folder
The first thing you might want to do before editing anything is to switch the Hachimi translation folder (also known as the localized data directory) to your local working copy of the translations. This will make Hachimi load translations from your local copy instead of the upstream repo so you can preview them in-game if needed.
To do this, open the "Hachimi Controls" view in the panel. Click on the "Set translation folder" button to set it. When you're done working on the translations, remember to click on the "Revert translation folder" button to revert it.
Editors
Annoying quirk
Before we even go into main interface of the editors, let's quickly cover a huge quirk of it. Try opening any of the assets that haven't been translated yet (with the checkbox next to their name unchecked). Something weird happens when the editor is opened.

Why are there two of them open at the same time, one is the custom editor, and the other is the normal text editor? This is an inherent quirk of how Visual Studio Code editors work; initializing the contents of a new file will cause the text editor to open and "hold the context" of the current file.
If you close the text editor, the custom editor will still be open, but it can't do anything since the file context has been lost (VSCode thinks you've already closed it). If you close the custom editor, both will be closed.
Luckily, this quirk is mostly painless if you get yourself used to a specific workflow.
When you've opened an asset but you don't wanna translate it, close the custom editor tab, this will also close the other tab.
If you do wanna translate it, save the file first, the custom editor will close (another weird quirk!), but now you can close the text editor and reopen the asset from the panel. Everything will now work as expected.
Common interface
Most of the editors share the exact same interface with similar behavior.
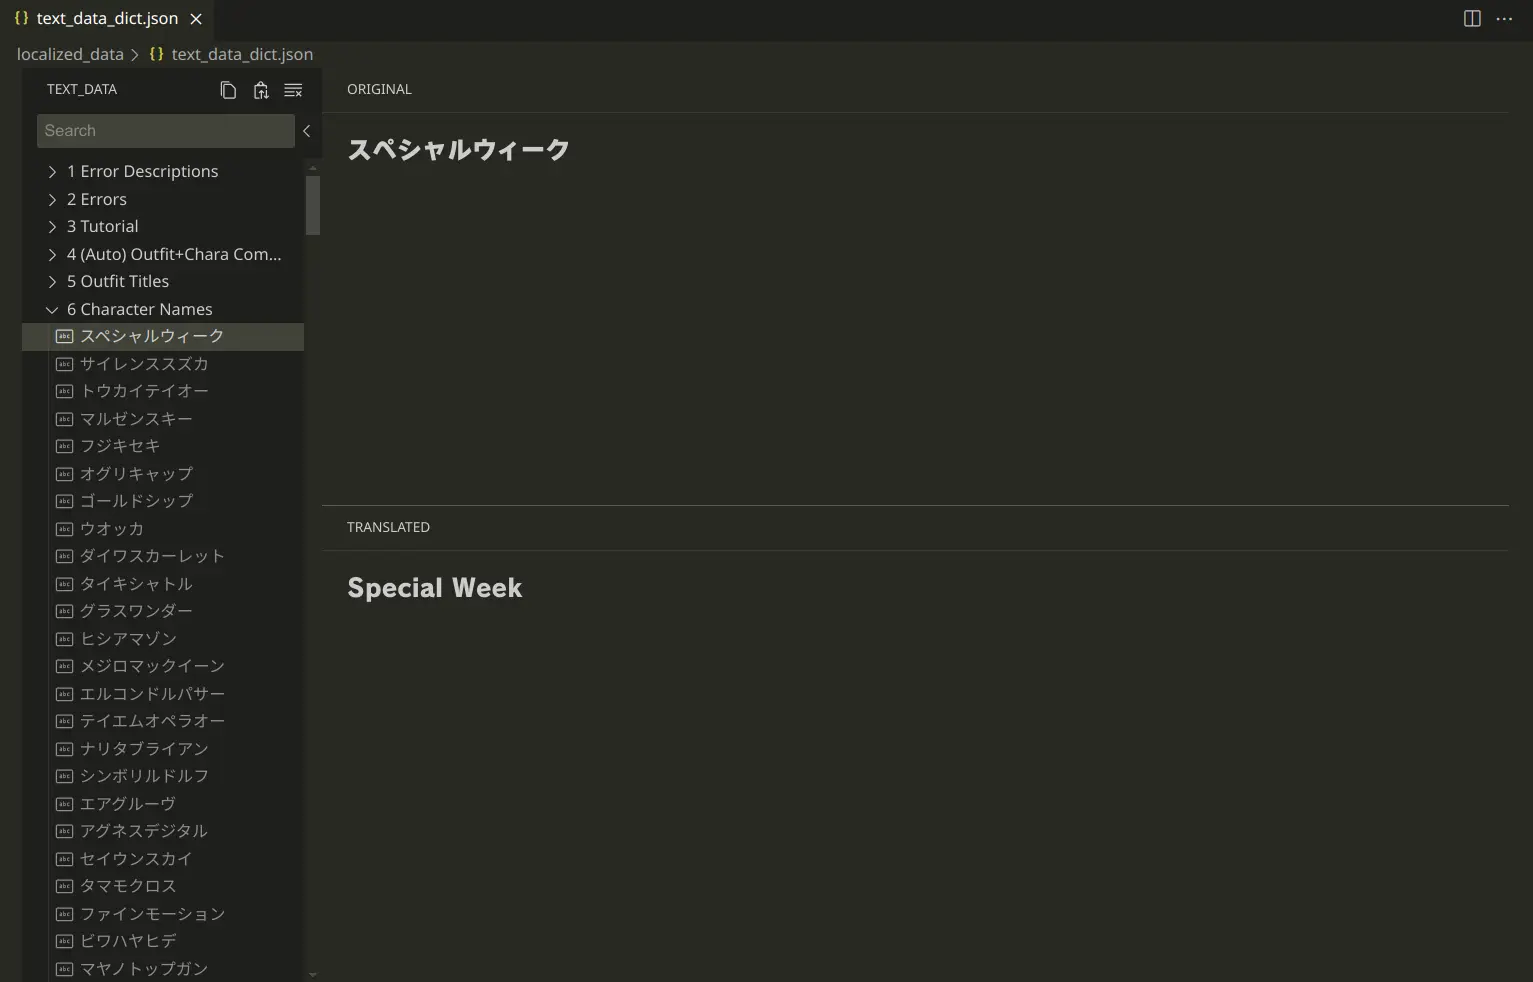
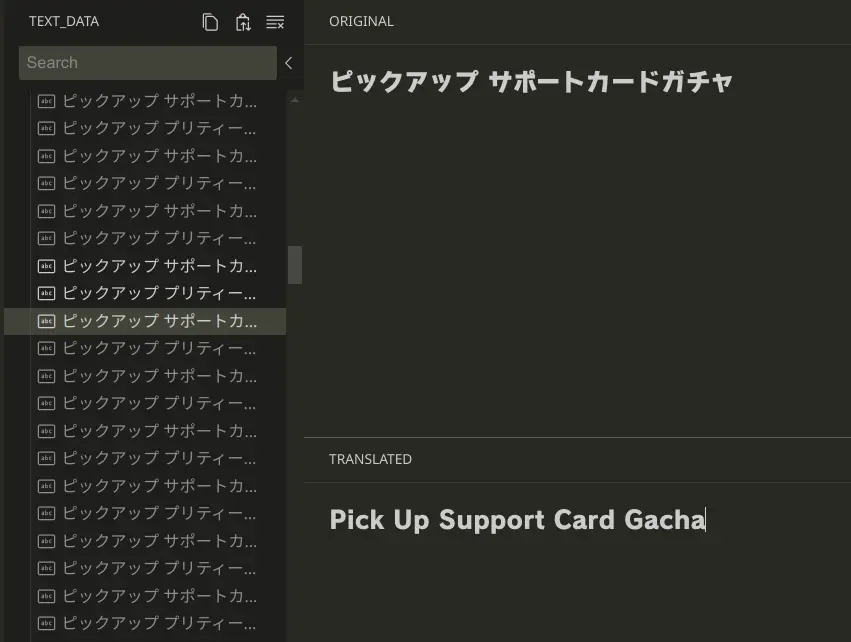
Basic usage should be self-explanatory; select an entry to translate, then enter your translated content in the "Translated" panel. The color of the entries represents their translation status. If it is greyed out, then that entry hasn't been translated.
Each of these entries can have multiple "text slots", they can mean different things depending on the editor that you're using. For example, each entry in the story editor has text slots for the speaker, the dialogue content, the choices, etc.
For most editors, leaving all of the text slots empty means that the entry does not exist. However, sometimes you might need to make the content empty instead of deleting the entry. For that, you can press Alt + Enter to set it to an empty string explicitly.
The panel on the left side of the editor is called the "Explorer". This is where you navigate through the entries within the dict by clicking on them. If it is being focused on (being the last panel that you clicked on), you can use the arrow keys on your keyboard to navigate instead. You can also do this without focusing on the Explorer first by pressing Alt + Arrow key.
Most of the editors follow the same convention: press Up to go to the previous entry, press Down to go to the next entry; however this behavior may differ depending on how the editor implemented it. You cannot navigate between categories using arrow keys.
You can select multiple entries by holding Ctrl down and clicking on the entries or dragging your cursor over them while holding the left mouse button down. This will not affect the translation editing behavior; whatever you enter in the Translated panel will only apply to the last selected entry. It is intended to be used with the Copy function (explained below).
Besides navigation, the Explorer also offers a few extra features:
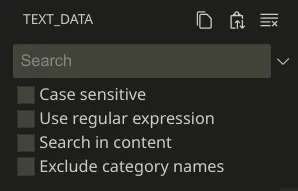
- The search bar can be used to search for entries. Pressing the arrow icon right next to it will reveal the search options. The "Search in content" option can be used to search for text inside the entry itself instead of just the name by default.
While the search function is being used, a virtual view will be used to display the matched entries. Arrow keys navigation will not work here. Empty the search bar to go back to the normal view.
On the panel's title, there are 3 buttons, from left to right:
- The Copy button allows you to arm entries for copying. When you click on it with one or more entries selected, those entries will now display a dashed border around them. This indicates that they've been armed for copying. Clicking on it again (with no entries selected) will clear their copying status.
- The Paste / Fill button will paste or fill the entries that are being copied onto the currently selected entries.
- The Clear button clears the translated content of the currently selected entries.
Let's talk a bit more about how the paste / fill function works. For example, if we have a single entry selected like this: 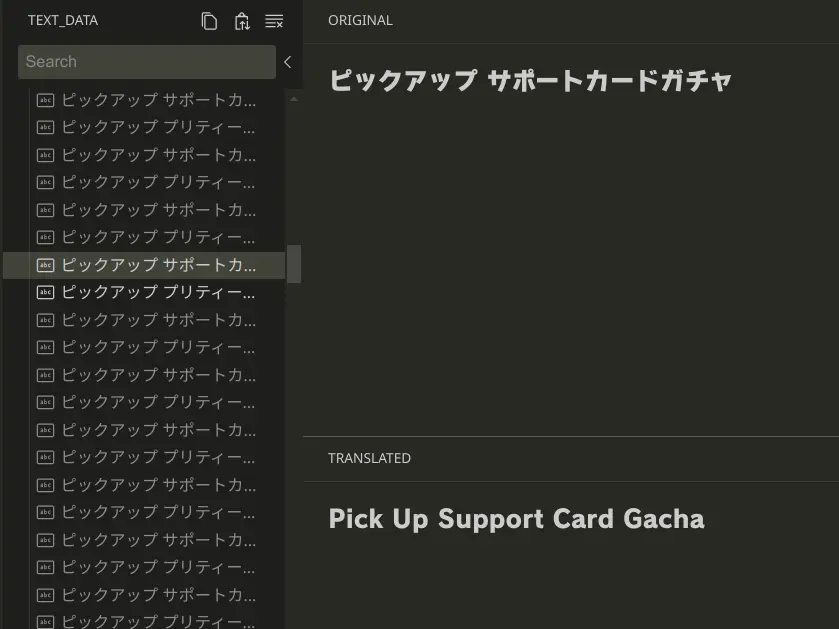
We arm that entry for copying, then select another entry and paste it. It will ask for the number of text slots you want to paste.

We can leave it empty and press Enter. The contents get copied as expected.
Now what will happen if we arm multiple entries for copying and also paste them to multiple entries?
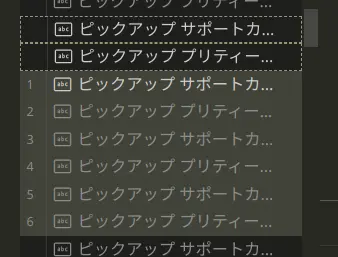
All of the selected entries will be filled in as expected. The editor iterates through the selected entries, pasting in content from the copying entries, and when it reaches the last copying entry, it goes back to the first copying entry and repeats that until it has filled all of the selected entries.
INFO
This filling behavior does not apply to text slots. If the destination has more text slots than the source, it will only paste in n amounts of text slots from the source, leaving the extra slots untouched.
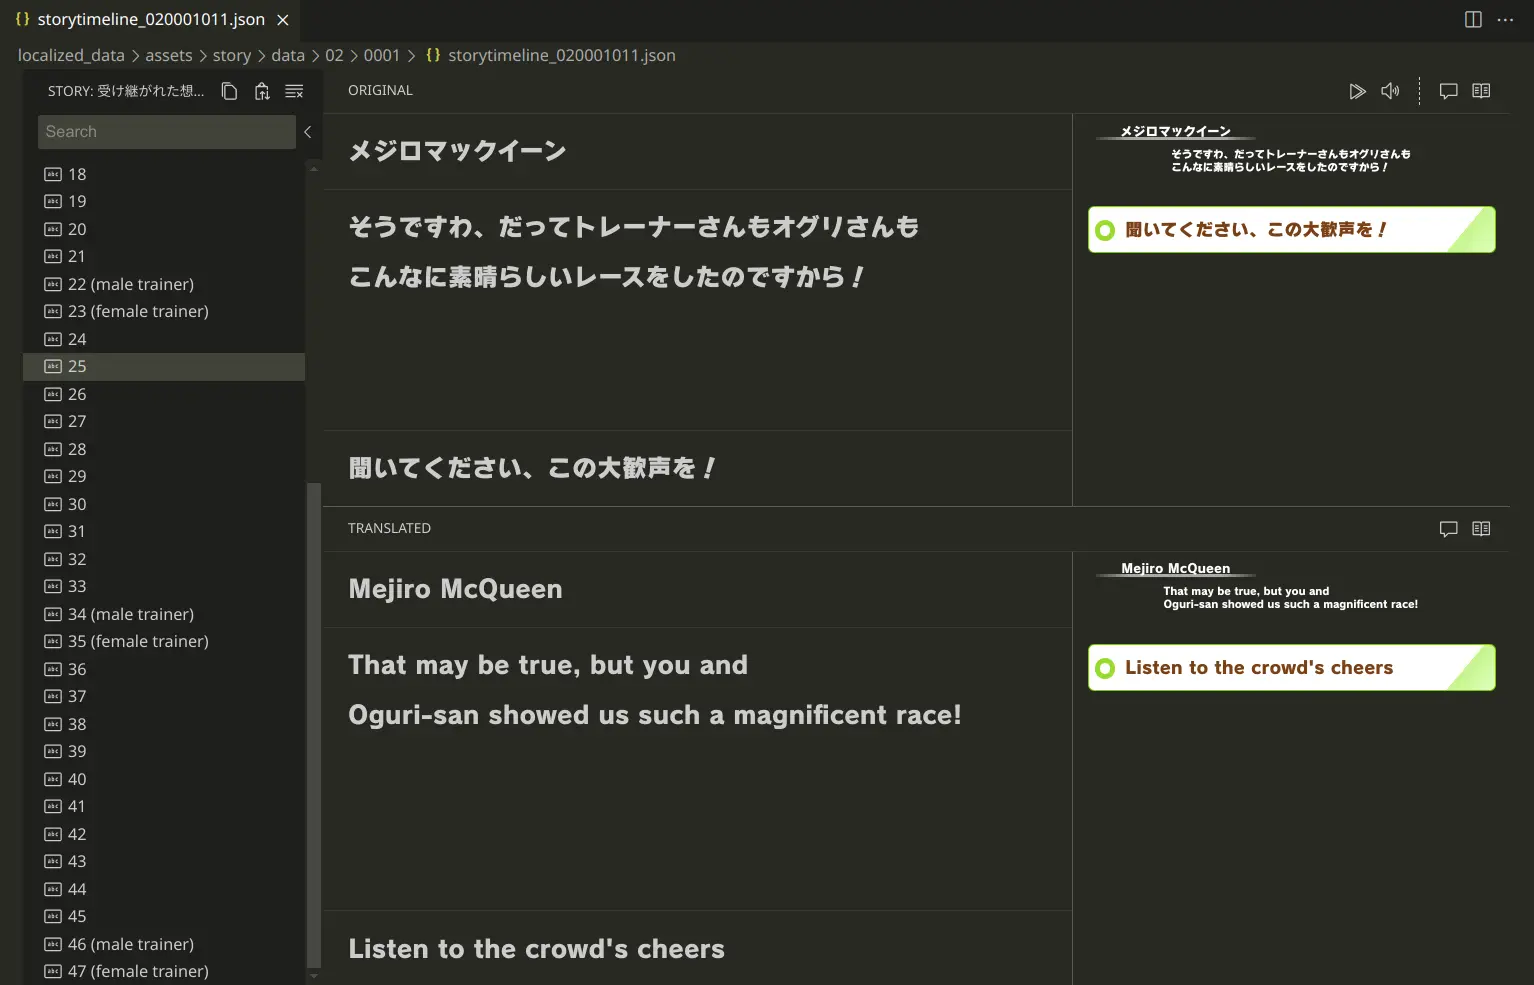
Story editor
The story editor is an extended version of the common editor with extra features for story translations. It is used for main/character/event stories, home dialogues and training dialogues.
Navigation
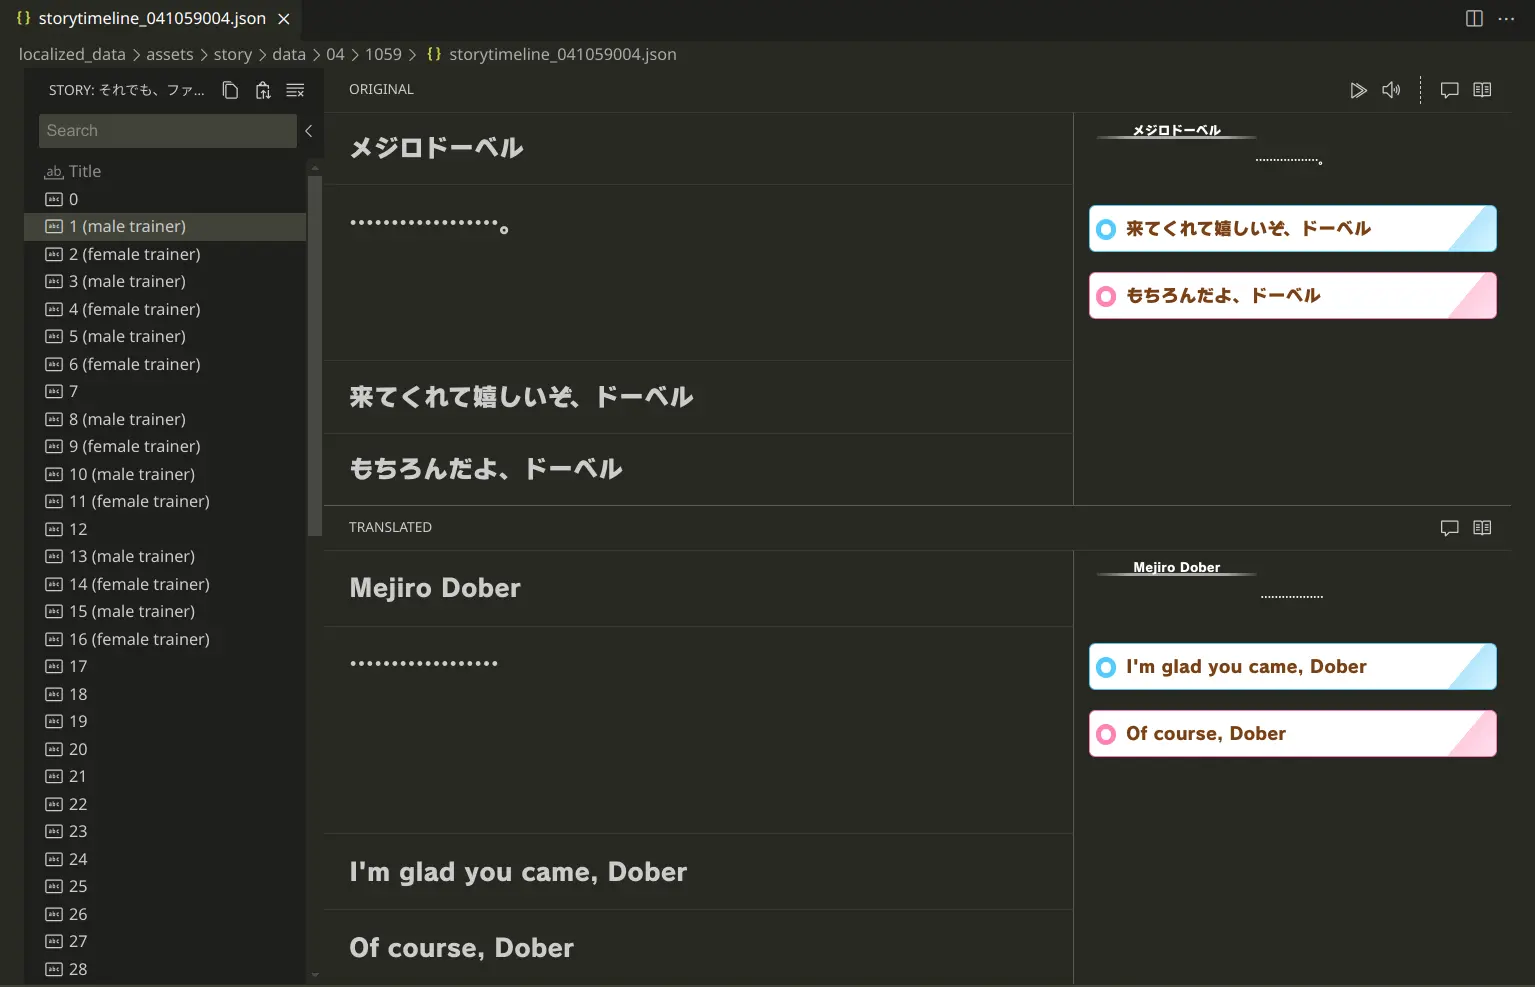
Arrow keys navigation serves an important purpose here. The Down arrow key will lead you to the next block within that story, which is not necessarily the next entry in the list.
For example, take a look at this story which has separate blocks for male and female trainers.

We're currently selecting the number 2 block. Normally, pressing Down here would lead to block number 3; however, since the logical order of the story is to go from either the male or female block to the next block, it will jump to block number 4 instead.
The Up arrow works normally here, but keep in mind that it will not follow the original order of the story. It's useful when you want to backtrack from the jumping behavior to select the skipped block.
It's highly recommended that you use the arrow keys to go through the story dict in the correct order. You should get yourself used to the Alt + Arrow key combination to make it easier.
Preview panels
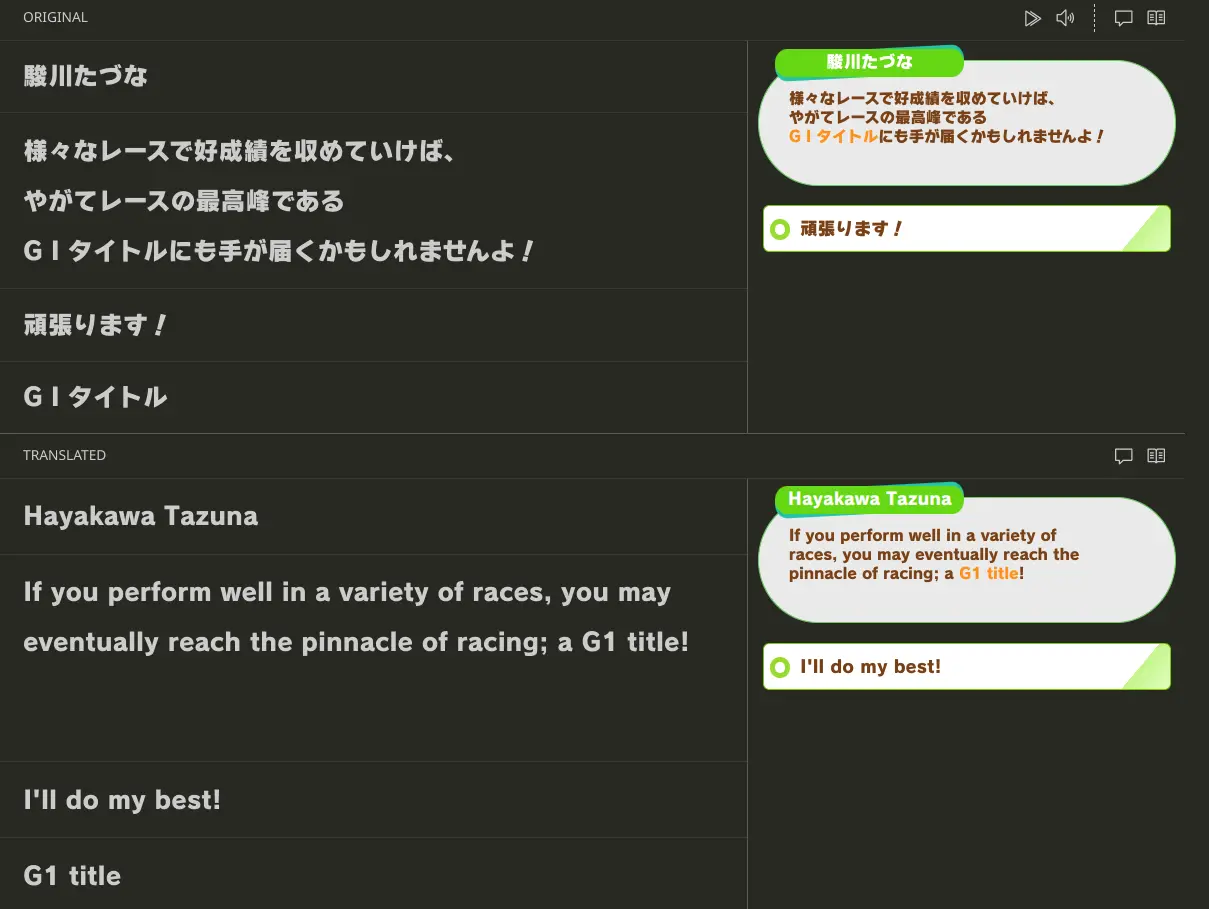
The most obvious addition to the editor is the two extra panels on the right side and the extra buttons on their parent panels:
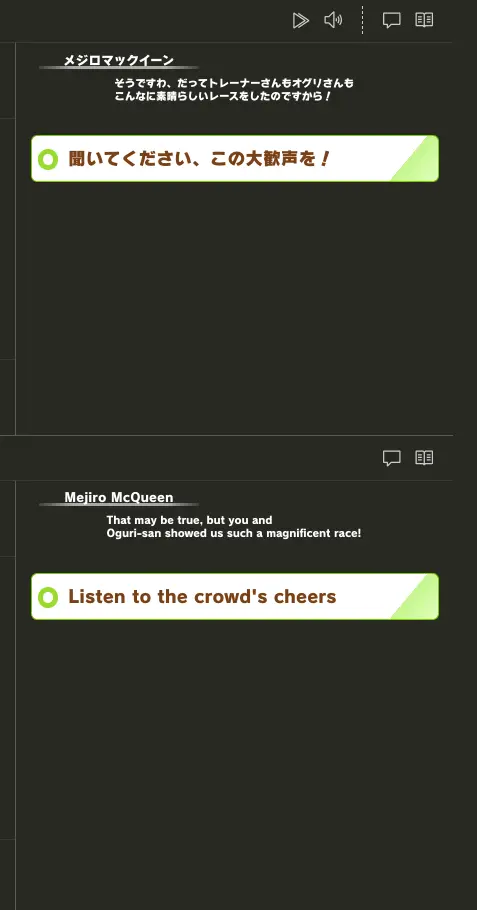
They are preview panels, which are designed to closely replicate how stories look in game as much as possible. Generally speaking, the dimensions of the text inside these previews are highly accurate, and arguably this is enough for you to safely assume how it actually looks.
If you're using it on Windows though, chances are that the look of the font might seem a little... off. Despite this, it shouldn't affect the accuracy much, it's mainly the font weight that's just slightly weird.
INFO
If you haven't realized it already, these editors are web-based. The game's font is not optimized for the web, hence the weird rendering.
The preview panel for the current type of story will be opened by default (however the story type is assumed and might not always be accurate). You can switch to a different preview panel by clicking on its associated button on the parent panel's title bar. Clicking on the button again will close the preview panel.
INFO
The text elements in the preview panels are "virtual" text slots. For the translated text slots, this means that the preview panel will not immediately update when the content is changed in the text slot's input, but rather, when the translated content has been committed to the file. See the Inner workings section for more info on how this works.
Original panel actions
In addition to the preview buttons, the Original panel has 2 extra buttons, from left to right:
- The Goto block button sends an IPC command to Hachimi to skip to a specific story block in game. For this to work, you need to have "Enable IPC" enabled in the Hachimi config, and you must also be viewing the story you're currently translating in the game. Useful for double checking if everything looks correct in-game.
- The Play voice clip button plays the voice clip for the current story block. This will only work for stories that are voice acted.
Text slots
Except for the "Title" entry, all entries within a story have at least 2 text slots: the speaker name and the dialogue content. Depending on the story block that an entry represents, there might be extra text slots for dialogue choices and colored text.
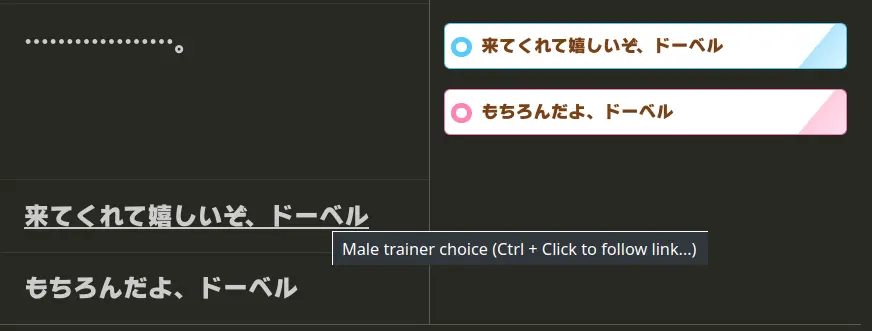
Choice text slots have a "link" assigned to them. Try hovering over them in the Original view or the preview panels; you'll notice that the text becomes underlined, indicating that it is a text slot with a link to another entry. You can press Ctrl + Left click to follow this link, which goes to the story block that this choice will lead to.
Choices can have variants for male and female trainers. Let's take a look at an extreme example:
Not only does this story block have male and female variants for the choice, the next story block that it points to (3 or 4) also has gender variants. If we take a look at the female variant for this block, we'll see that it also contains both choice variants, despite the fact that it's only shown to female trainers.
Due to this odd system, both choice variants on the male block will be linked to the next male block (number 3) and vice versa on the female block (linked to number 4)
These choice text slots have a tooltip to indicate which gender they're meant for, and they're also color coded in the preview panel (normal choices will always be green, male choices are blue and female choices are pink, it is not colored by their order like how it works in-game)
The last type of text slots is the color text slots. They're used to mark sections of the content that should be colored. Let's look at an example:
They are placed after all of the other text slots. The first substring in the content that matches the color text chunk will be colored. The preview panel shows how this works, but note that the color is only for referencing purposes only, it might not match the actual color that's used in-game. Make sure to follow the order as they appear in the Original view to correctly match up the colors.
Inner workings
TODO
Advanced usage
Reopen a file in ZokuZoku
Sometimes you might need to open a dict file directly instead of opening it through the ZokuZoku panel. This will launch the built-in text editor instead, so you'll need to reopen it in ZokuZoku's custom editor.
Open the VSCode command bar (Ctrl+Shift+P) and execute the "Reopen editor with..." command. Choose the suitable editor from ZokuZoku for your current dict file.
Live text editor split view
You can have the text editor and the custom editor open at the same time to view your changes to the actual file in real-time. This is also a good demonstration of how it works internally.
Press Ctrl+\ to open the split view. While focused on the second view, open the VSCode command bar (Ctrl+Shift+P) and execute the "Reopen editor with..." command. Choose the built-in text editor.
You can now make changes to the file using either editors, and those changes will be reflected in both of them. Note that the custom editor will refuse to do anything if the current file content is malformed.